
Photo by Juanjo Jaramillo on Unsplash
From Code to Deployment - A Complete CICD journey for Java Apps using Jenkins, Nexus, Sonarqube, AWS ECR & ECS
Complete CICD Pipeline for Java apps
Table of contents
- Prerequisites
- First Phase - Continuous Integration
- Step 1. Configure AWS Console
- Step 2. Post installation steps
- Step 3. Configuring our CI Tool, Jenkins
- Step 4. Building our Jenkins Jobs
- Step 5. Analyzing Code with SonarQube
- Step 6. Publishing our Artifact to Nexus Repo
- Step 7. Adding notifications
- Second Phase - Continuous Delivery
- AWS ECS Setup
Hey there, fellow tech enthusiasts! 🌟 Are you ready to dive into an exciting journey of setting up a complete CI/CD pipeline for your Java application?
Let's join hands and explore the magic of Jenkins, Nexus, SonarQube, AWS ECR & ECS together! 🚀 From seamless integration to top-notch code quality and effortless deployment, we've got it all covered.
So, grab your virtual hardhats, and let's build an amazing and automated workflow that'll make our Java development dreams come true! 🛠️💻

Let's jump right in and embrace the power of modern DevOps tools! 🌈💪
First off .... let us look at the recipe of doing this project.
Prerequisites
AWS Account
GitHub account
Jenkins
Nexus
SonarQube
Slack
🌐 AWS Account: Our cloud powerhouse! 🏢 AWS (Amazon Web Services) provides the infrastructure for deploying, scaling, and managing our application in the cloud. With AWS, we'll have a reliable and flexible environment to run our CI/CD processes and deliver our app to the world! 🌍💻
🐙 GitHub Account: Our coding playground! 🚀 GitHub is where we'll host our Java application's source code, enabling collaboration, version control, and seamless integration with other DevOps tools. Get ready to explore the wonders of collaboration and open-source development! 🤝💻
🏗️ Jenkins: Our master orchestrator! 🎯 Jenkins will take the lead in automating our CI/CD pipeline. It'll handle tasks like building, testing, and deploying our Java app, freeing us up to focus on what we love—coding like pros! 💻🚀
📦 Nexus: Our artifact manager! 🌟 Nexus helps us store and organize our project's build artifacts. From dependencies to binaries, Nexus ensures everything is in its place, making our CI/CD pipeline super efficient and reliable! 🛠️🏢
🔍 SonarQube: Our code quality watchdog! 🚦 SonarQube will keep a close eye on our Java code, checking for bugs, vulnerabilities, and maintaining top-notch code quality. With SonarQube's insights, we'll polish our code to perfection! ✨🐞
💬 Slack: Our communication hub! 📢 Slack brings the team together, making it easy to share updates, celebrate wins, and handle any hiccups along the way. It's our go-to platform for staying connected and building a collaborative DevOps dream team! 🤗💬
Get ready to rock this CI/CD adventure! 🎉 Together, we'll automate, innovate, and create an impressive Java application that shines brightly in our tech galaxy! 🌌💫 Let's fire up those keyboards and make our DevOps dreams come true! 💪🔥
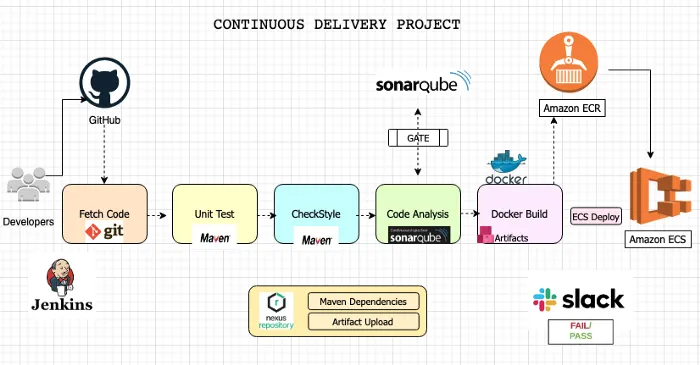
Please click here to view the source code for this project.
First Phase - Continuous Integration
Step 1. Configure AWS Console
As you must have noticed on the diagram above of our entire project, AWS is the endpoint, it is where our app will be finally deployed. The first step is for use Configure our AWS account.
Step 1.1 Create a Key-pair
We will start our project by creating a key-pair on our AWS account. So let us go ahead and create a key pair and save the private key (.pem) to your computer. Recall where you download and keep your key (.pem file) because you'll need it to ssh onto our virtual machines.
Step 1.2 Create security group for Jenkins, Nexus and Sonarqube
Now that we have created our key-pair and assured our connection to our virtual machines. Now we need to create the firewalls / security groups that our apps will need. So let us look at the configurations of our different security groups (S.G.)
Jenkins S.G.
Name: jenkins-SG
Allow: SSH from MyIP
Allow: 8080 from Anywhere IPv4 and IPv6
Nexus S.G.
Name: nexus-SG
Allow: SSH from MyIP
Allow: 8081 from MyIP and Jenkins-SG
Sonarqube S.G.
Name: sonar-SG
Allow: SSH from MyIP
Allow: 80 from MyIP and Jenkins-SG
Before we go to the next step, we also need to add another entry to Jenkins Inbound rule. It will allow access on 8080 from sonar-SG. We added this extra S.G. setup to ensure that Sonarqube is able to send reports to Jenkins.
Step 1.3 Create EC2 For our Backend tools (Jenkins, Nexus and Sonarqube)
Now that we have setup the firewalls / security groups for the virtual machines (EC2) that will contain our apps, we need to now setup the virtual machines themselves. To do that, we will go to the ec2 page on our AWS Console and go through the steps to create our EC2 instances, but remember to make sure to add the userdata needed to configure our EC2.
Step 1.3.1 Setting up our Jenkins Server
First, let us get our Jenkins server setup. Please click here if you would rather get to the source code in the Github repo.
First, let us look at the configuration of our Jenkins EC2 instance.
Name: jenkins-server
AMI: Ubuntu 20.04
Security Group: jenkins-SG
Instance Type: t2.small
KeyPair: ci-key
Additional Details: userdata below
Before creating our EC2 instance, we need to set it up. To do that, we will add some code to our userdata. We will scroll down to the Advanced details section of our EC2 creation page. Please click here for the script to paste in the user data of out EC2
Step 1.3.2 Setting up our Nexus Server
Next, let us get our Nexus server setup. Just like we did before, Let us look at the config that we need for our Nexus server.
Name: nexus-server
AMI: Amazon Linux-2
Instance Type: t2.medium
Security Group: nexus-SG
KeyPair: ci-key
Additional Details: userdata below
Now we do the same thing as we did for our Jenkins EC2. Click here for the script to paste in the user data of out EC2
Step 1.3.3 Setting up our Sonarqube Server
Lastly, let us set up our Sonarqube server. Like we did earlier on, let us look at the config that we need for our Sonarqube server.
Name: nexus-server
AMI: Amazon Linux-2
Instance Type: t2.medium
Security Group: sonar-SG
KeyPair: ci-key
Additional Details: userdata below
Lastly, we configure our Sonarqube server like we did the other two. Click here for the script to paste in the user data of out EC2
Step 2. Post installation steps
Now that we have finished setting up all our 3 backend servers. We need to check that the process was indeed successful. TO do that, we will need to SSH to one server after another to check that.
We will need to SSH to our 3 EC2 instances (Jenkins, Sonar and Nexus). To do this, we can either
use
AWS Instance ConnectOpen the Amazon EC2 console at https://console.aws.amazon.com/ec2/.
In the navigation pane, choose Instances.
Select the instance and choose Connect.
Choose EC2 Instance Connect.
Verify the user name and choose Connect to open a terminal window
use an SSH Client (such as the terminal in your computer), making use of the Key-pair that we created and downloaded to our local computers in the previous steps. We can use
ssh -i aws_private_key.pem \
ubuntu@ec2-3-135-209-28.us-east-2.compute.amazonaws.com
- use the AWS cli using the AWS commands such as
aws ec2-instance-connect ssh --instance-id i-1234567890example --private-key-file /path/to/key.pem
Step 2.1 Setting up our Jenkins Server
Now that we have accessed our Jenkins server using any of the methods above, next we will check if the installation was indeed a success. Also, we will need to get the password we will need to access our Jenkins server.
Run the commands below
sudo -i
system status jenkins
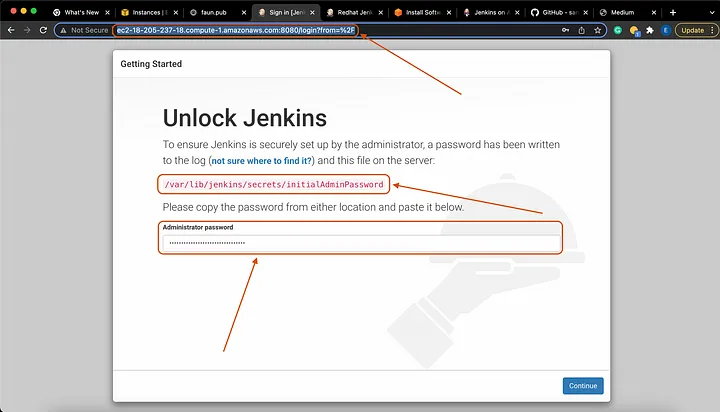
Great!!!!!! Next we will need the password to unlock our Jenkins server. There are several commands you can use for this.
cat /var/lib/jenkins/secrets/initialAdminPassword
# Or if your Jenkins is running in a Docker container, you can use this command
docker exec -it cat /var/lib/jenkins/secrets/initialAdminPassword

We have our Jenkins credential and we can now access our Jenkins console in our browser. To do that, we will copy the public IP of our Jenkins-EC2, paste it in the browser and add our 8080 Jenkins port to access it.
http://<public_ip_of_jenkins_server>:8080

Yay!!!!!!! We have successfully created our Jenkins server. Now we will use the password we got in the previous step to Unlock Jenkins
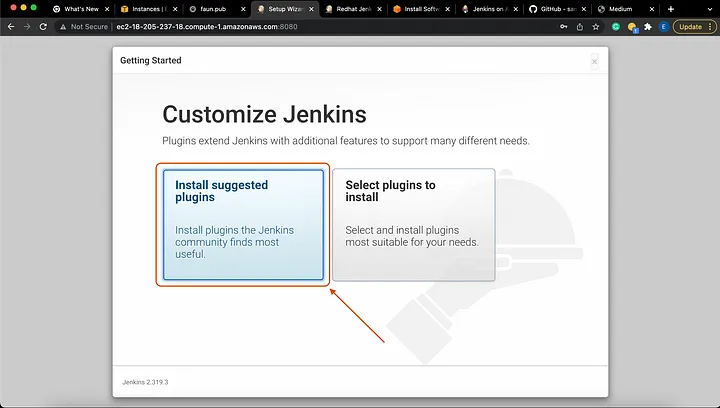
To install commonly used plugins, select Install suggested plugins:
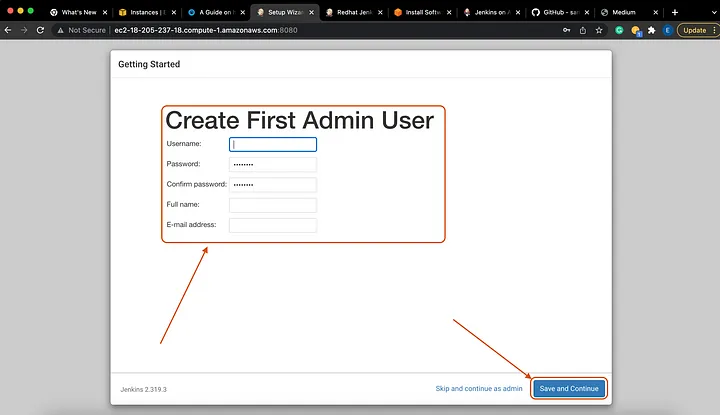
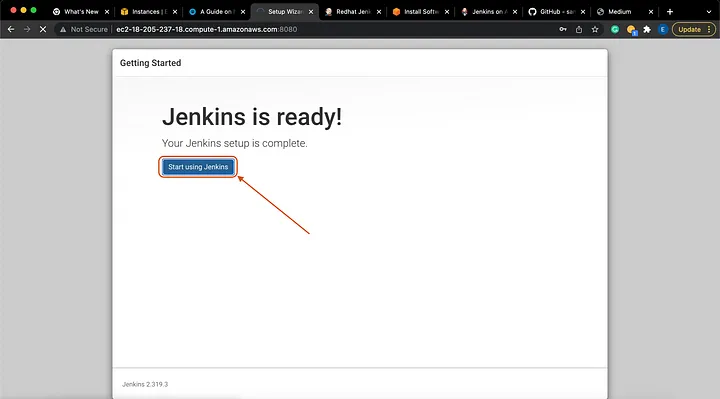
Great work so far, getting so far!!! .. Kudos.....
Next we will need to install some plugins into our Jenkins server. This will enable our Jenkins server to effectively work as our CI tool.
First, let us look at how to install plugins to our Jenkins server.
To do so, click on the Manage Jenkins button on the left pane of our Jenkins console.

Next, scroll down a tad bit and Click on Manage Plugins .

Next, click on the Available tab on the left pane. You will see a filter button on the top right corner of our Jenkins console, there we will type what we want to install. Once you find all the plugins you are looking for, make sure to tick on the boxes on the left of the plugins, then click on the button Install without restart.
In this example, I will search for maven.

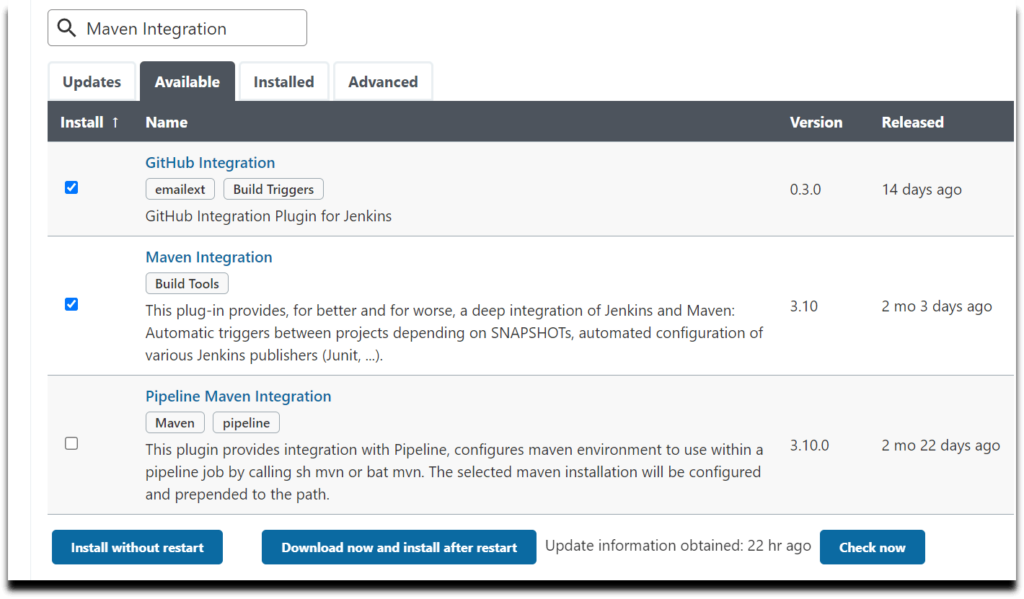
Make sure to do the same steps above to install all the plugins below
Maven Integrator
Maven Invoker
Github Integration
Nexus Artifact Uploader
SonarQube Scanner
Slack Notification
Build Timestamp
Docker Pipeline
CloudBees Docker build and Publish
Amazon ECR
Pipeline: AWS Steps
Step 2.2 Setting up our Nexus Server
Good job setting up our Jenkins server.

Next we will set up our Nexus server. As you may already know, Nexus is a Repository tools similar to Docker Hub. So this is the place where the artifact that our Jenkins server will create, will be kept.
First, we will SSH to our Nexus server like we did before with our Jenkins server. Next, we will go to our browser and sign into our Nexus server. Nexus app uses port 8081 and that is why we opened up that port when setting up our nexus-SG.
http://<public_ip_of_nexus_server>:8081
Next, you will be requested to put in your password to login to the server. Just like we did with Jenkins, we need a username and password to access our Nexus server. The username is admin and for the password, type the command below to get it
cat /opt/nexus/sonatype-work/nexus3/admin.password
Now that we have accessed our Nexus server, we will need to configure it. We will create 2 repositories. One to host our Jenkins artifacts and one to host our maven app. Please follow the following steps:
- Setup new password and select
Disable Anonymous Access.
For our new password, please use a simple one such as admin
new password = admin
Now let us get started setting up our repositories:
Select the
gearsymbol andcreate the repositoryon the Nexus repo.- This
repowill be used to store ourrelease artifacts, created by Jenkins.
- This
maven2 hosted
Name: profile-release
Version policy: Release
- Next, like before select the
gearsymbol and create another repo, we will create aMaven2 proxy repo. Maven will store its dependencies in this repository. Nexus will then download it whenever we need any dependency for our projects
maven2 proxy
Name: pro-maven-central
remote storage: https://repo1.maven.org/maven2/
- Our next repo we will create will be a
maven2 hosted repo. It will be used to store the snapshot of our artifacts created by Jenkins. Use the information below to create it.
maven2 hosted
Name: profile-snapshot
Version policy: Snapshot
- Our last repo is a
maven2 grouptype repo. We will be using it to group all our recently created nexus repositories. We will use the information below to do that
maven2 group
Name: pro-maven-group
Member repositories:
 - profile-release
 - pro-maven-central
 - profile-snapshot
Let us look at what our repos on Nexus look like after having created all our repos.
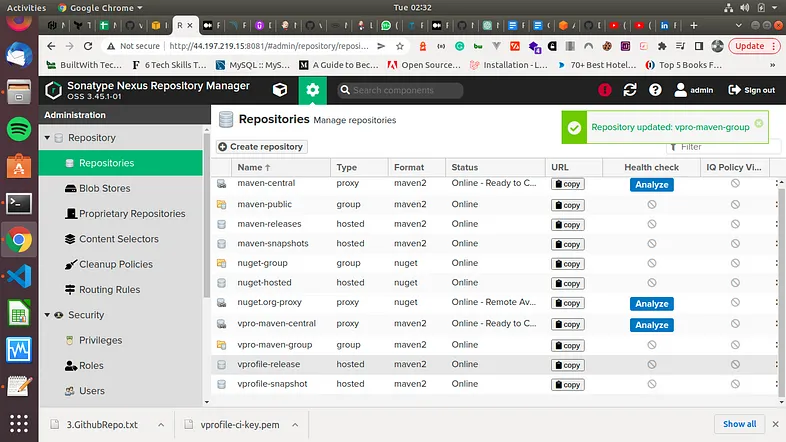
Now, if you want you can login again to your Nexus repo, go to your browser, and login with username - admin and password - admin
http://<public_ip_of_sonar_server>:8081
username - admin
password - admin
Step 2.3 Setting up our Sonarqube Server
You are going at it Hard!!!
Awesome job setting up our Nexus server. Now we will setup our Sonarqube server. Let us run a bash script to get this installed
wget http://repo.mysql.com/mysql-community-release-el7-5.noarch.rpm
sudo rpm -ivh mysql-community-release-el7-5.noarch.rpm
sudo yum install mysql-server
sudo useradd sonarqube
Step 3. Configuring our CI Tool, Jenkins
Good job getting so far. Now we will starting building our jobs in Jenkins.
Step 3.1 Installing Maven and JDK8 on Jenkins server
First, since we will be creating java apps, we need to install JDK8 and maven on our Jenkins EC2 virtual machine. To do this, click here to read another article where we install maven step by step.
To make it easier, let us just use bash script
Step 3.1.1 Installing Maven on our Jenkins server
#!/bin/bash
sudo wget https://repos.fedorapeople.org/repos/dchen/apache-maven/epel-apache-maven.repo -O /etc/yum.repos.d/epel-apache-maven.repo
sudo sed -i s/\$releasever/6/g /etc/yum.repos.d/epel-apache-maven.repo
sudo yum install -y apache-maven
sudo yum install java-1.8.0-devel
sudo /usr/sbin/alternatives --config java
sudo /usr/sbin/alternatives --config javac
Now that is how to install maven to our Jenkins server using our yum package manager. In case you would prefer a more manual installation of Maven, you can use this script
#!/bin/bash
cd /opt
yum install wget -y
wget https://dlcdn.apache.org/maven/maven-3/3.9.3/binaries/apache-maven-3.9.3-bin.tar.gz
tar -xzf apache-maven-3.9.3-bin.tar.gz
cd apache-maven-3.9.3
Now that maven is installed, we need to get the path where we have just installed it. We will do the ls command to get that
[root@ip-10-0-0-25 apache-maven-3.6.0]# pwd
/opt/maven/apache-maven-3.9.3
Please make sure to keep the path /opt/maven/apache-maven-3.9.3 as we will use it in our Jenkins server configuration.
Step 3.1.2 Installing JDK8 on our Jenkins server
#!/bin/bash
sudo apt update -y
sudo apt install openjdk-8-jdk -y
sudo -i
ls /usr/lib/jvm
### Since we installed 2 versions. We will get jdk-11 and jdk-8 in this path ###
java-1.11.0-openjdk-amd64 java-11-openjdk-amd64 openjdk-11
java-1.8.0-openjdk-amd64 java-8-openjdk-amd64
# So the locations are as follows
/usr/lib/jvm/java-1.11.0-openjdk-amd64
/usr/lib/jvm/java-1.8.0-openjdk-amd64
/usr/lib/jvm/java-8-openjdk-amd64
/usr/lib/jvm/java-11-openjdk-amd64
/usr/lib/jvm/openjdk-11

Please make note of the locations of our Java installations as we will use it in the next step as our JAVA_HOME variable on our Jenkins server.
Step 3.2 Setting up Java & Maven on Jenkins server
On your Jenkins welcome page, go to -> Manage Jenkins on the left pane -> Click on Global Tool Configuration. We will scroll down and continue with our configuring. Go down to JDK and -> Add JDK.
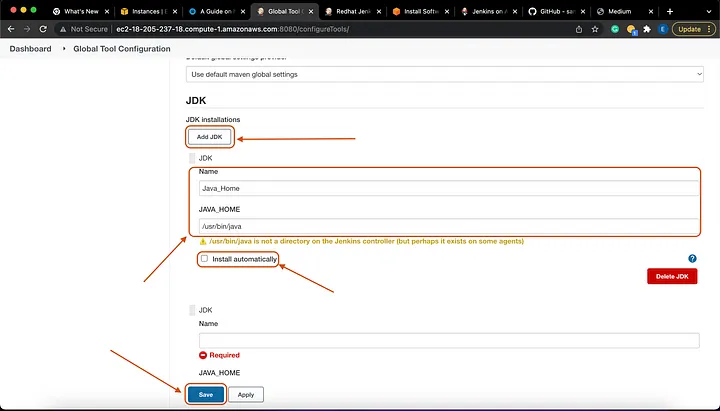
Name: Java_Home
# Make sure to *UNTICK* - Install Automatically
# For our JAVA_HOME variable, we will use any of the one we mentioned before.
JAVA_HOME: /usr/lib/jvm/java-11-openjdk-amd64
Again, we will scroll down and continue configuring. Scroll down to Maven and -> Add Maven.

Name: MAVEN_HOME
# Make sure to *UNTICK* - Install Automatically
# For our JAVA_HOME variable, we will use any of the one we mentioned before.
MAVEN_HOME: /opt/maven/apache-maven-3.9.3

Step 3.2 Setting up Nexus on our Jenkins server
Now let us go ahead and setup our Nexus app on our Jenkins server. We will be adding the credentials. Go to Manage Jenkins -> Manage Credentials -> Global -> Add Credentials.
username: admin
password: <pwd_setup_for_nexus> # Remember we changed the password to admin
ID: nexuslogin
description: nexuslogin
Step 4. Building our Jenkins Jobs
There are 2 ways to build with our Jenkins tool. You can build jobs on Jenkins using the Jenkins UI (so on the app, clicking here and there), or you can do the same build job using a Jenkinsfile. We will be using a Jenkinsfile. Let us look at the Jenkinsfile that we will be using.
pipeline {
    agent any
    tools {
        maven "MAVEN3"
        jdk "OracleJDK8"
    }
    environment {
        SNAP_REPO = 'profile-snapshot'
        NEXUS_USER = 'admin'
        NEXUS_PASS = 'admin'
        RELEASE_REPO = 'profile-release'
        CENTRAL_REPO = 'pro-maven-central'
        NEXUSIP = '172.31.11.249'
        NEXUSPORT = '8081'
        NEXUS_GRP_REPO = 'pro-maven-group'
        NEXUS_LOGIN = 'nexuslogin'
        SONARSERVER = 'sonarserver'
        SONARSCANNER = 'sonarscanner'
        NEXUSPASS = credentials('nexuspass')
    }
    stages {
        stage('Build'){
            steps {
                sh 'mvn -s settings.xml -DskipTests install'
            }
            post {
                success {
                    echo "Now Archiving."
                    archiveArtifacts artifacts: '**/*.war'
                }
         }
    }
}
Now that we have the Jenkinsfile ready, let us create the job on jenkins. Here is the configuration
Pipeline from SCM
Git
Repository URL: #GitHub Repo Link
##### For the branch, make sure to use the right branch name as what you have
Branch: */ci-jenkins
path: Jenkinsfile
Give any name you want to your job. I called mine Pipeline. Now we scroll down ...
Some steps will appear on your screen. The next step is for us to integrate the Jenkinsfile in our SCM tool (Github).
To do that, we must select ‘Pipeline script from SCM’.
So now in the SCM dialog box, select Git.
Add the Github repository URL. -
https://github.com/apotitech/vprociprojectYou can add the credentials if any.
Jenkinsfileis the name of the Script, so we will add it to the script path at the bottom
Step 4.1 Build Time
Now we can start cooking / building with Jenkins. Before we do this, let us setup the webhook which will trigger builds on Jenkins whenever there is a change on our Github repository. First, we will go to our GitHub repository -> Settings -> Webhooks -> Add JenkinsURL with /github-webhook/ at the end.
https://<Jenkins-EC2-URL:8080/github-webhook/
Next, we will add this parameter to our Jenkins job. So we will go back to our Jenkins server and add the configuration below to our pipeline job. Scroll down to the Build Trigger page of our Pipeline Jenkins job and tick the 4 which isGitHub hook trigger for GITScm polling.

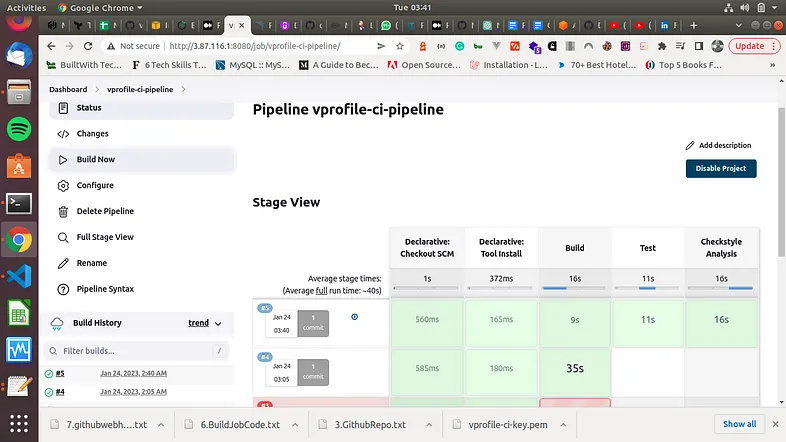
So now that we have done this config changes, anytime we do a git push to the Github repo which we are using, it will trigger a Jenkins build process.
Step 5. Analyzing Code with SonarQube
So far, we have setup our servers, configured our jobs and ran a successful test pipeline. Now, we will proceed with code analysis. For this, we will need SonarScanner plugin added to Jenkins so it can scan our code. Secondly, we need Sonarqube info in Jenkins so it will know where to upload reports of the scanned code.
Step 5.1 Integrate Jenkins and Sonarqube
Before we setup our Jenkins to work with Sonarqube, we will firs setup our Sonarqube server.
For us to Integrate the Jenkins DevOps environment with our Sonarqube installation, we will need to generate an access token.
Our generated token will be used later, in Jenkins for Sonar authentication.
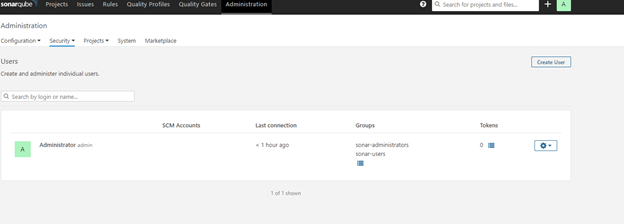
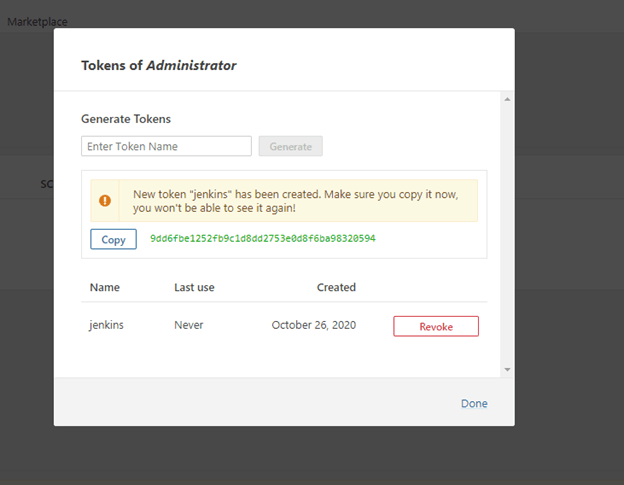
Now generate token with an appropriate name, which is under Administration -> Security -> Users ->Tokens.
In the previous step, we already added the sonar scanner when installing our plugins. Now we will go and configure it. - Go to Manage Jenkins -> Global Tool Configuration
Add sonar scanner
name: *sonarscanner*
    TICK -> Install Automatically <-
Next we will go to Configure System, scroll down to Sonarqube servers section
TICK -> environment variables <-
ADD sonarqube
    Name: sonarserver
    Server URL: http://<private_ip_of_sonar_server>
    Server authentication token: we need to create token from sonar website

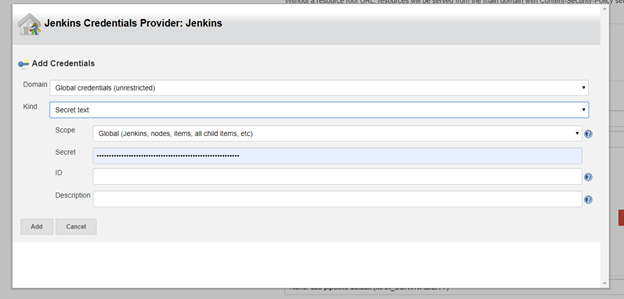
We have almost finished setting up our Sonarqube so we can start testing. Now we need to add our sonarqube credentials.
Go to Manage Jenkins -> Manage Credentials -> Global -> Add Credentials.
Kind: secret text
Secret: <paste_token>
name: sonartoken
description: sonartoken

That was quite a little long, awesome job making it so far!!!!!!!
Adding Sonarqube to our Jenkinsfile Now that we have finished setting up our Sonarqube, we can finally add it to our pipeline. So here is the bit of code that we are adding to our Jenkinsfile
##new environment variables to be added to environment##
SONARSERVER = 'sonarserver'
SONARSCANNER = 'sonarscanner'
##new stages to be added##
 stage('CODE ANALYSIS with SONARQUBE') {
          environment {
             scannerHome = tool "${SONARSCANNER}"
          }
          steps {
            withSonarQubeEnv("${SONARSERVER}") {
               sh '''${scannerHome}/bin/sonar-scanner -Dsonar.projectKey=vprofile \
                   -Dsonar.projectName=vprofile-repo \
                   -Dsonar.projectVersion=1.0 \
                   -Dsonar.sources=src/ \
                   -Dsonar.java.binaries=target/test-classes/com/visualpathit/account/controllerTest/ \
                   -Dsonar.junit.reportsPath=target/surefire-reports/ \
                   -Dsonar.jacoco.reportsPath=target/jacoco.exec \
                   -Dsonar.java.checkstyle.reportPaths=target/checkstyle-result.xml'''
            }
          }
Our job was a total success. Next, let us go view the SonarQube server's quality gate results. Note that we can also design our own Quality Gates for our project. This is what mine looks like now.
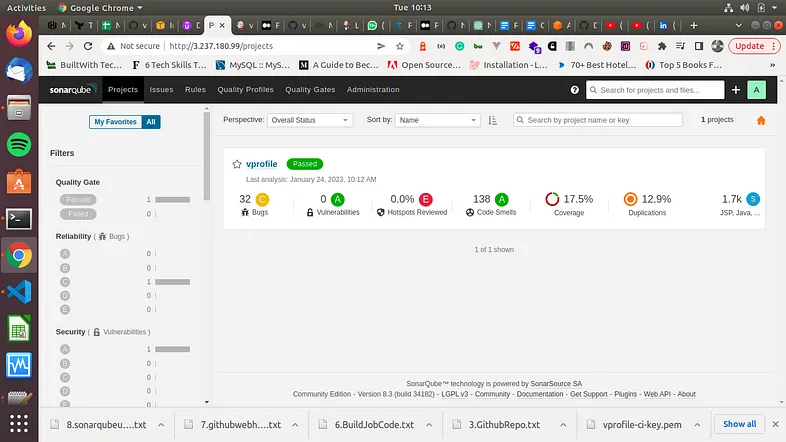
We have gotten the analysis of our build results. Next we need to get this to our Jenkins server. To do this, we'll develop a Webhook. We will create this webhook in our Sonarqube console
Step 5.2 Creating a webhook in Sonarqube
For us to create a webhook at the project level, first we will navigate to the Projects tab, click on the name of your project, and then Project Settings > Webhooks.

Next click on Create at the top right corner and this screen below will appear. Next, go ahead and type in the _Name_ of the webhook. _URL_ should be your URL for Jenkins followed by /sonarqube-webhook. Save the webhook and we are all set.
http://<jenkins_ec2_instance_ip>:8080/sonarqube-webhook

Our webhook has been setup and now we can proceed. We will add another stage to our Jenkinsfile. This is what the code block looks like
stage('QUALITY GATE') {
            steps {
                timeout(time: 10, unit: 'MINUTES') {
               waitForQualityGate abortPipeline: true
            }
            }
}
Now we run our Jenkins Job again ..... SUCCESSFUL BUILD!!!
Step 6. Publishing our Artifact to Nexus Repo
So far created our pipeline and added bits and pieces to it. At this point, we will automate the process of publishing our latest artifacts to our nexus repo after successful build.
First we need to go add a timestamp to the names of our artifacts that Jenkins builds, so that all the artifacts will have unique names. So we will go to Manage Jenkins -> Configure System under Build Timestamp and update to preference.
yy-MM-dd_HHmm
We have been adding code blocks to our Jenkinsfile, let us do the same now, let us add the code block for uploading our artifac.
stage('UPLOAD ARTIFACT') {
                steps {
                    nexusArtifactUploader(
                        nexusVersion: 'nexus3',
                        protocol: 'http',
                        nexusUrl: "${NEXUSIP}:${NEXUSPORT}",
                        groupId: 'QA',
                        version: "${env.BUILD_ID}-${env.BUILD_TIMESTAMP}",
                        repository: "${RELEASE_REPO}",
                        credentialsId: ${NEXUS_LOGIN},
                        artifacts: [
                            [artifactId: 'vproapp' ,
                            classifier: '',
                            file: 'target/vprofile-v2.war',
                            type: 'war']
                        ]
                    )
                }
        }
Again, we go ahead and run our pipeline again ....
Success!!!!

The build is successful and this time, our artifact is uploaded to our Nexus repo.
Great job making it so far. Stopping here, it will still be a huge endeavor on our part creating such a magnificent pipeline piece by piece all from the ground up.
For those who want to continue, next we will be adding slack notifications to our pipeline.
Step 7. Adding notifications
Let's begin by setting up Slack so Jenkins can communicate with it. We'll build a custom Slack app—which needs an Administrator account—to accomplish this.
We'll make an application in Slack and generate an OAuth token. Here are the steps
First go to https://api.slack.com.
Open the desired workspace and log in.
Select "
Start Building" from the menu.Give it a name (like
jenkins-cicd) and selectCreate App.Click on
OAuth & Permissions.In the
Bot Token Scopes section, addchat: write scopeSelect "
Install App to Workspace"Select "
Accept" from the menu.
Workspace: softwaresennin (in the workspace url softwaresennin.slack.com)
credential: `slacktoken`
default channel: #jenkins-cicd
When it's finished, a summary screen will appear:
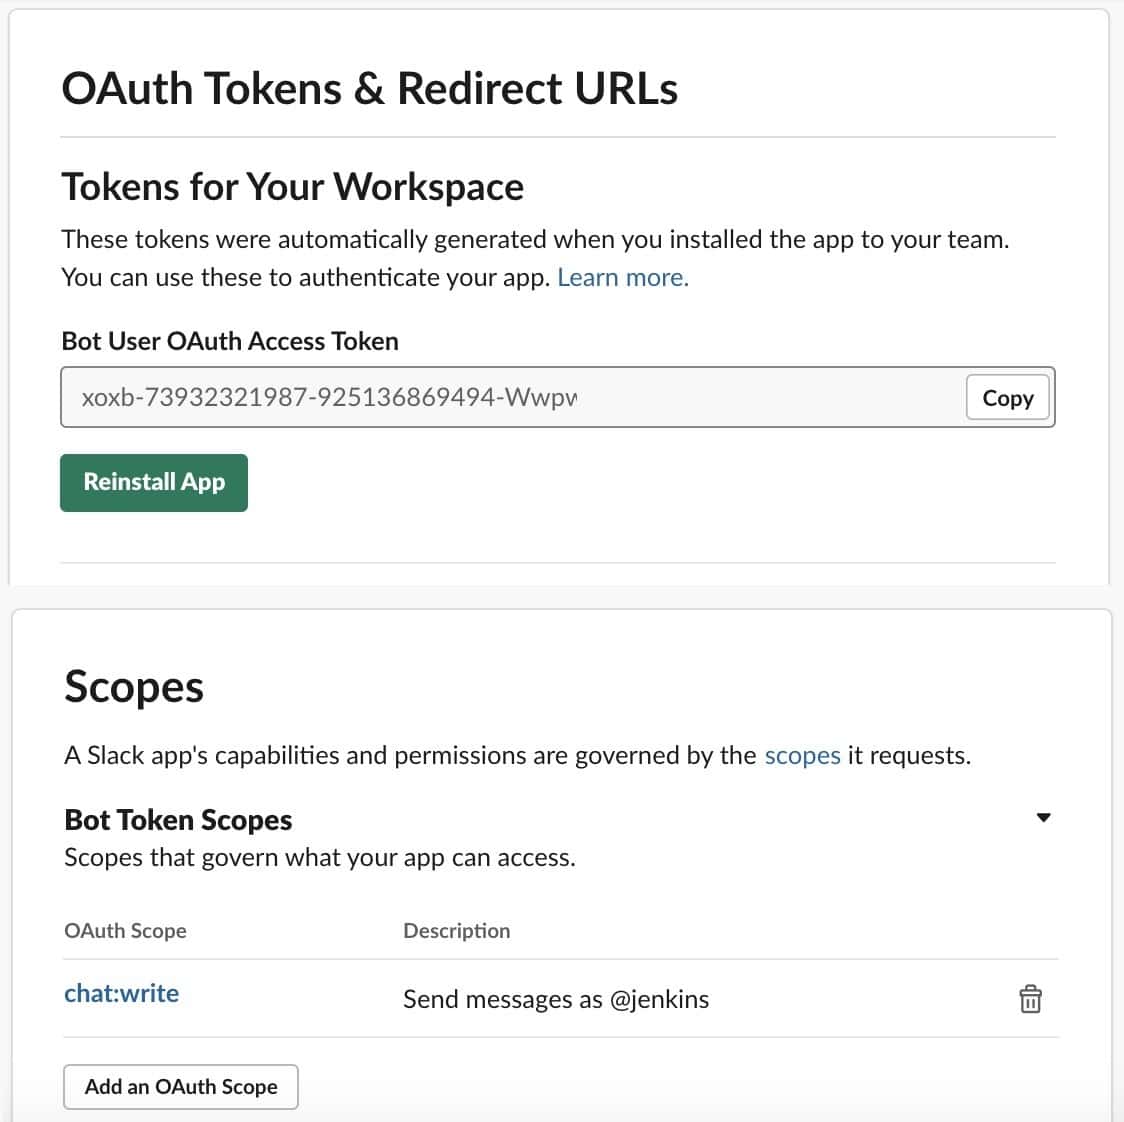
We must now remember to save the OAuth token because we'll need it to set up Jenkins later. These credentials need to be protected and kept safe.
Now, we need to invite Jenkins user to the channels that we want it to use, in order to finish the Slack setup. Mentioning the new user inside each channel using the @ character is one quick way to achieve this.
Now let us go and setup slack in our Jenkins console. Let us go to Manage Jenkins > Plugin Manager.
Then, on the Available tab, we'll search for Slack:
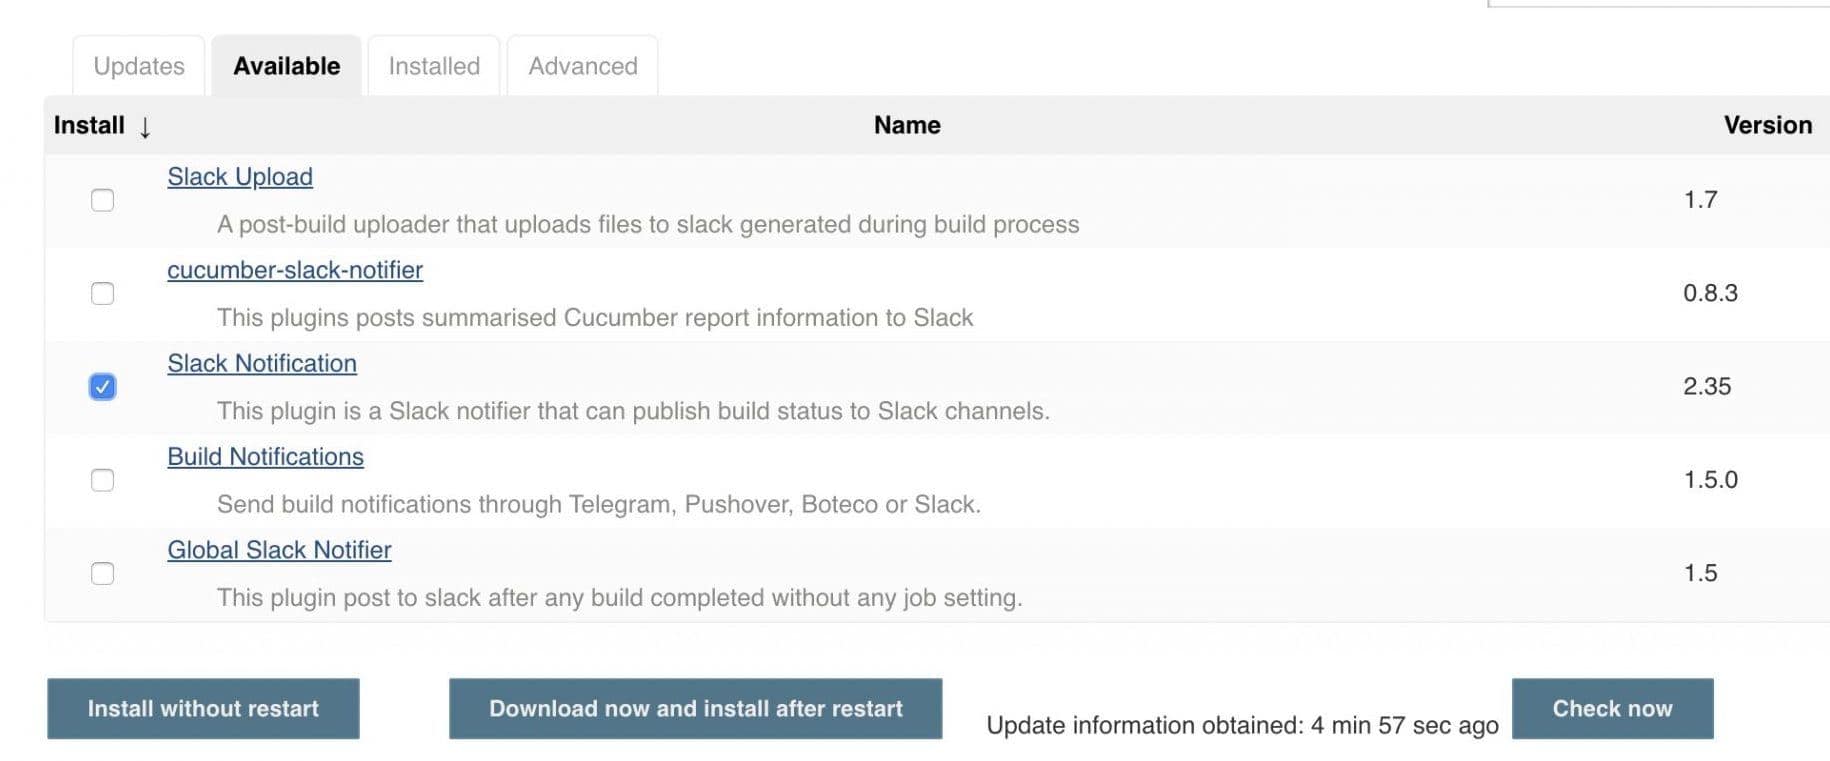
Let's click Install without restartafter selecting the Slack Notification checkbox.
We must now set up new credentials. Let's add a new Secret text credential by going to Jenkins > Credentials > System > Global Credentials:
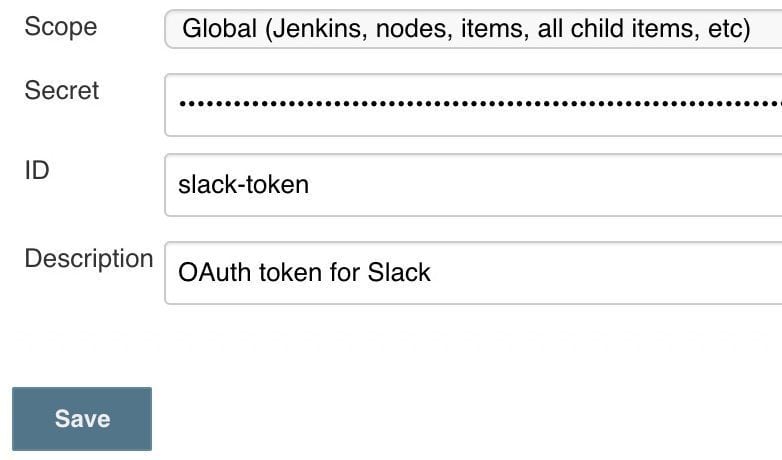
We'll enter the Slack OAuth token in the Secret field. To make them easier to find later, we should additionally give these credentials a relevant ID and description. This token should be stored safely in the Jenkins credentials store.
There is still one more global configuration to configure after saving the credentials. It is necessary to choose the Custom slack app bot user checkbox under the Slack section under Jenkins > Manage Jenkins > Configure System:
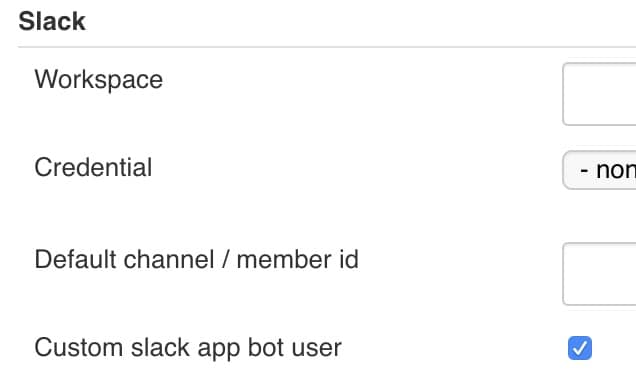
Now let us add the code block for this slack notification
post{
        always {
            echo 'Slack Notifications'
            slackSend channel: '#jenkinscicd',
                color: COLOR_MAP[currentBuild.currentResult],
                message: "*${currentBuild.currentResult}:* Job ${env.JOB_NAME} build ${env.BUILD_NUMBER} \n More info at: ${env.BUILD_URL}"
        }
    }
Now we run another build with Jenkins ....
Great Job!!!!!!! Now we receive slack notifications!
We have built a really great cicd pipeline so far, let us take a look at the entire pipeline.
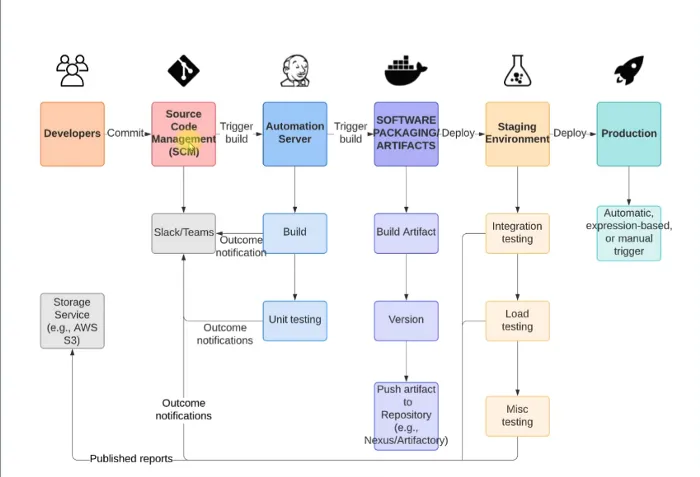
Congratulations to completing the first part of our CI/CD pipeline, the Continuous Integration phase. Now we go to the Continuous Delivery phase.

Second Phase - Continuous Delivery
We will begin this second phase by creating another git branch. To do this, we can create this new branch on our girhub account or clone it first to our local machine and then do this.
Using your Github account, create another branch from the ci-jenkins branch that we had created when we started. We will call this branch cicd-jenkins
git checkout ci-jenkins # This command will switch us to our branch
git checkout -b cicd-jenkins # This command will create our new branch from it
To do this in our EC2 instance, clone our repository to our Jenkins EC2 instance. First SSH to it then run the commands below
git clone https://github.com/apotitech/vprociproject # make a clone of the repo to EC2
mkdir StagePipeline/ ProdPipeline/  # this will create these 2 folders
cp Jenkinsfile StagePipeline/  # to copy our Jenkinsfile to the StagePipeline folder
cp Jenkinsfile ProdPipeline/  # to copy our Jenkinsfile to the ProdPipeline folder
Setup IAM User & ECR
We now need out Jenkins to connect to our ECR. This means we need to create IAM permissions for our Jenkins user and ECR repository.
Let us now proceed and create our ECR repo, we will call it profileappimg
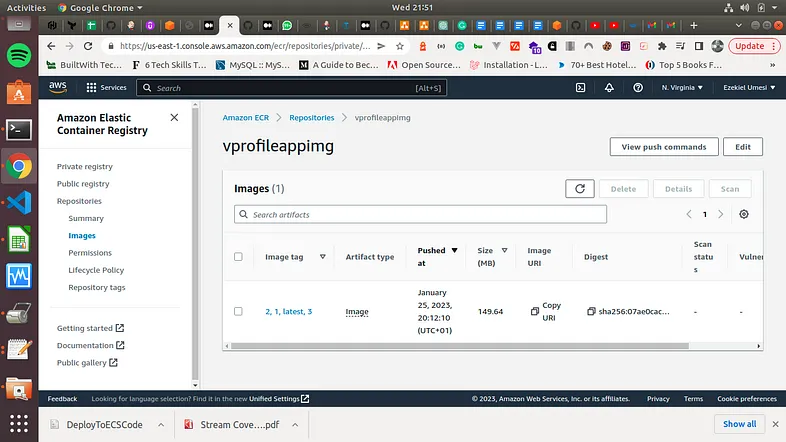
To proceed, we need to first add our AWS credentials to our Jenkins console. We already installed the Cloudbees AWS Credentials plugin when we were adding all the other plugins. Here is a screenshot of that.


Next ... we add our credentials to our Jenkins console. First -> Manage Jenkins -> Security Manage Credentials -> Click on Global then -> Stores scoped to Jenkins -> Add credentials

Now that we are on this page, we will be able to store the secrets -> Click on the Kind drop-down and select AWS. Specify a name for the secrets, description, Access Key ID and Secret Access Key. Click on OK to store the secrets.

Now we have added our secret

Our next step, is to install Docker in our Jenkins server.
Setup Docker in Jenkins EC2
To install Docker in this our Jenkins EC2 instance, we will use our bash script below
#!/bin/bash
sudo apt update -y
sudo apt-get upgrade -y
sudo apt install openjdk-11-jdk -y
curl -fsSL https://pkg.jenkins.io/debian/jenkins.io-2023.key | sudo tee \
  /usr/share/keyrings/jenkins-keyring.asc > /dev/null
echo deb [signed-by=/usr/share/keyrings/jenkins-keyring.asc] \
  https://pkg.jenkins.io/debian binary/ | sudo tee \
  /etc/apt/sources.list.d/jenkins.list > /dev/null

sudo apt-get update
sudo apt-get install jenkins -y

# Next we will stup our Jenkins user
sudo su - jenkins
usermod -aG docker jenkins
id jenkins
systemctl restart jenkins
Now that we have installed Docker in our server, we can go ahead and add the code block for building our docker image. We will add the env variables below and also add stages to the Jenkinsfile under StagePipeline directory.
#### 3 new environment variables ####
        registryCredential = 'ecr:us-east-1:awscreds'
        appRegistry = '392530415763.dkr.ecr.us-east-1.amazonaws.com/vprofileappimg'
        profileRegistry = "https://392530415763.dkr.ecr.us-east-1.amazonaws.com"
################################
    stage('Build App image'){
            steps{
                script{
                  dockerImage = docker.build( appRegistry + ":$BUILD_NUMBER", "./Docker-files/app/multistage/")
                }
            }
        }
        stage('Upload App Image'){
            steps{
                script{
                    docker.withRegistry( vprofileRegistry, registryCredential ) {
                        dockerImage.push("$BUILD_NUMBER")
                        dockerImage.push('latest')
                    }
                }
            }
        }
Next ... we will commit our changes to git and push the changes. Then we will create a new pipeline in Jenkins.
Job Name: profile-cicd-pipeline-docker
Job Type: Pipeline
Build Trigger : GitSCM polling
SELECT -> Pipeline from SCM
URL : SSH url of the GitHub Repo
branch: cicd-jenkins
ScriptPath: StagePipeline/Jenkinsfile
The Docker pipeline has been successfully completed, and our docker image has been pushed to the ECR repository.
AWS ECS Setup
We have created our docker images and deployed them to ECR repository. We now need a tool that we will be able to use to manage all of our docker containers. We will use ECS for this. So our next steps are
Create an ECS Cluster for our Staging environment.
Next, create a Task definition to create our app containers.
Name: proappstagetask
containerName: proapp
Port: 8080
Image URI: <paste_the_image_from_ECR>
Environment: Fargate 1 vCPU, 2 GB memory
- Now, let us create our service
Name: proappstagesvc
Replica: 1
task definition: proappstagetask
LoadBalancer: create new
target-group: proappstagetg HTTP 80
secGrp: proappstagesg
HTTP 80
Health check: /login
Grace period: 30
We now need to update the port to 8080 in both the target group and security group. We can now go to the page of our app and it is working. Our service is running, we can check the app from the browser using the ALB URL. Let us check our cluster
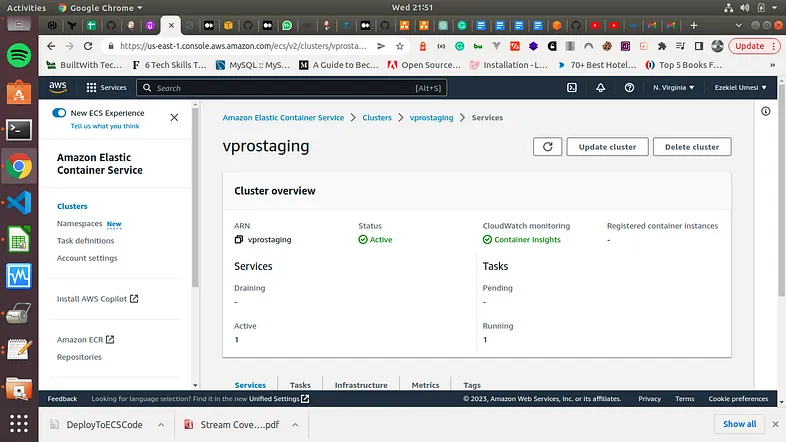
Our next step is to add the deploy stage to Jenkinsfile along with two new variables. Now that this is done, we need to now Commit/push changes to GitHub and this should trigger our pipeline automatically.
Let us add that step to our Jenkinsfile
#### new environment variables ####
cluster = "vprostaging"
service = "vproappstagesvc"
####
stage('Deploy to ECS Staging') {
                steps {
                    withAWS(credentials: 'awscreds', region: 'us-east-1') {
                        sh 'aws ecs update-service --cluster ${cluster} --service ${service} --force-new-deploymnet'
                    }
                }
        }
Yay!!!!!!!!!!!!!!!!!!!!!!!!!!!!!

You made it this far!!!!! That is an amazing accomplishment. Many people start but do not get to the end of such long tutorials. Kudos to you getting this far.
It took me about 3 days to complete this article.

I am so glad it is finally done. It has been a real journey for me as it has been for you, putting all these together into so much details. I hope this has been as interesting and great as it has been to me.
Thank you for taking the time to read this! If you like the article, please clap (up to 50 times!) and connect with me on LinkedIn, Medium and Dev.to to remain up to speed on my future articles. 😅

