Table of contents
- Overview
- Objectives
- Open BigQuery Console
- Task 1. Query a public dataset
- Load the USA Names dataset
- Query the USA Names dataset
- Task 2. Create a custom table
- Download the data to your local computer
- Task 3. Create a dataset
- Task 4. Load the data into a new table
- Preview the table
- Task 5. Query the table
- Congratulations!
Overview
Storing and querying massive datasets can be time consuming and expensive without the right hardware and infrastructure. BigQuery is an enterprise data warehouse that solves this problem by enabling super-fast SQL queries using the processing power of Google’s infrastructure. Simply move your data into BigQuery and let us handle the hard work. You can control access to both the project and your data based on your business needs, such as giving others the ability to view or query your data.
You access BigQuery through the Cloud Console, the command-line tool, or by making calls to the BigQuery REST API using a variety of client libraries such as Java, .NET, or Python. There are also a variety of third-party tools that you can use to interact with BigQuery, such as visualizing the data or loading the data. In this lab, you access BigQuery using the web UI.
You can use the BigQuery web UI in the Cloud Console as a visual interface to complete tasks like running queries, loading data, and exporting data. This hands-on lab shows you how to query tables in a public dataset and how to load sample data into BigQuery through the Cloud Console.
Objectives
In this lab, you learn how to perform the following tasks:
Query a public dataset
Create a custom table
Load data into a table
Query a table

Open BigQuery Console
- In the Google Cloud Console, select Navigation menu > BigQuery.
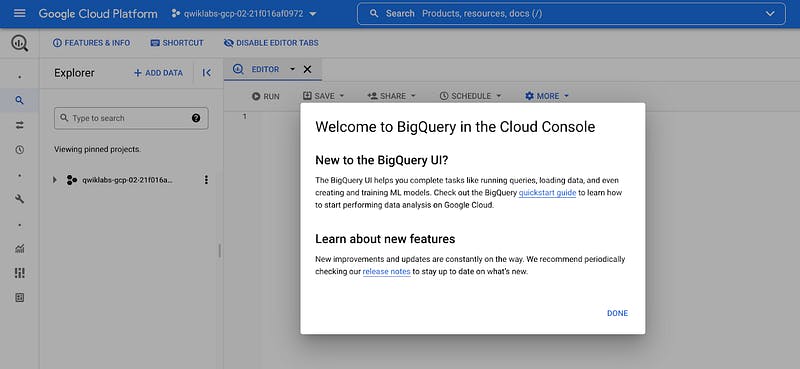
The Welcome to BigQuery in the Cloud Console message box opens. This message box provides a link to the quickstart guide and lists UI updates.
2. Click Done.
Task 1. Query a public dataset
In this task, you load a public dataset, USA Names, into BigQuery, then query the dataset to determine the most common names in the US between 1910 and 2013.
Load the USA Names dataset
- In the left pane, click ADD DATA > Explore public datasets.
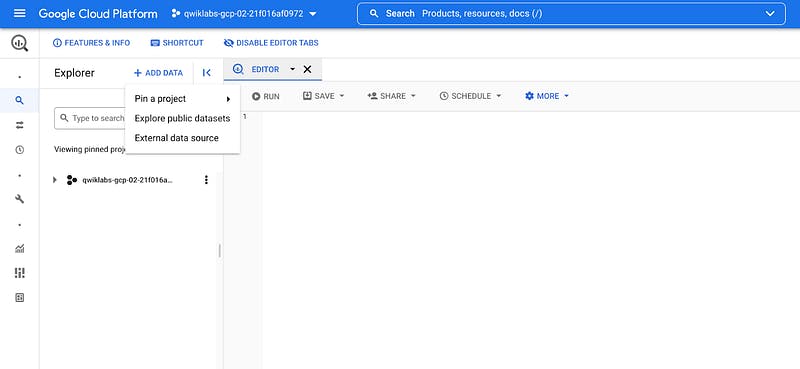
The Datasets window opens.
2. In the searchbox, type USA Names then press ENTER.
3. Click on the USA Names tile you see in the search results.
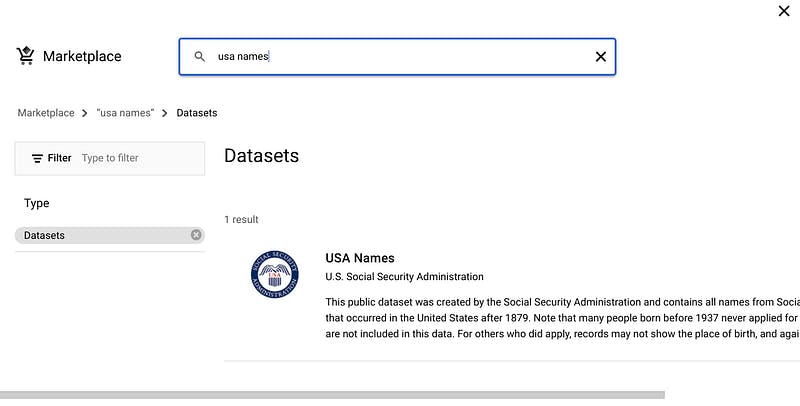
4. Click View dataset.
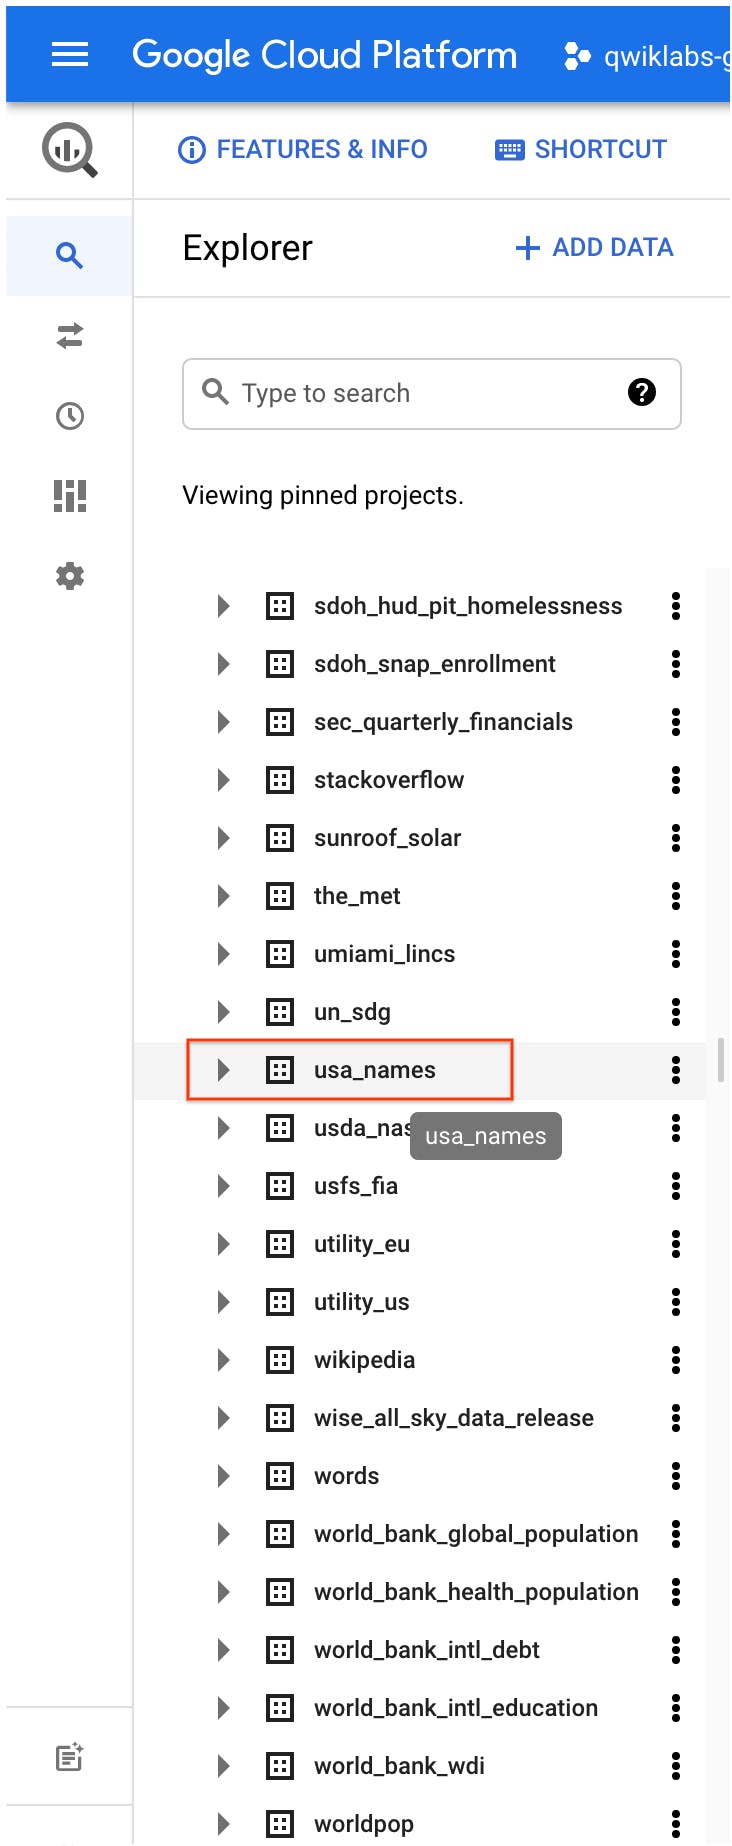
BigQuery opens in a new browser tab. The project bigquery-public-data is added to your resources and you see the dataset usa_names listed in the left pane in your Resources tree.
Query the USA Names dataset
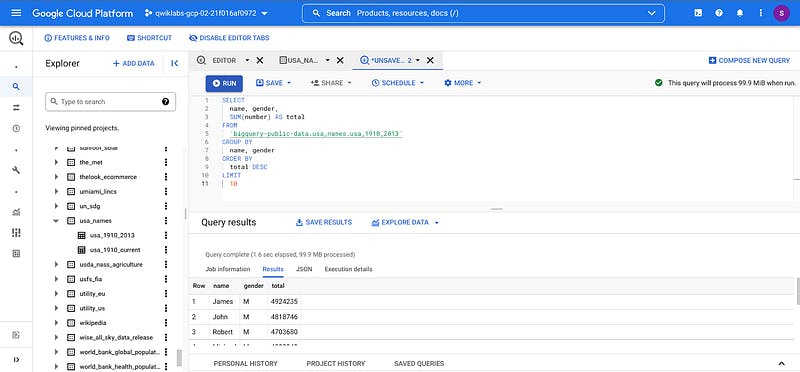
Query bigquery-public-data.usa_names.usa_1910_2013 for the name and gender of the babies in this dataset, and then list the top 10 names in descending order.
- Copy and paste the following query into the Query editor text area:
SELECT
  name, gender,
  SUM(number) AS total
FROM
  `bigquery-public-data.usa_names.usa_1910_2013`
GROUP BY
  name, gender
ORDER BY
  total DESC
LIMIT
  10
2. In the upper right corner of the window, view the query validator.

BigQuery displays a green check mark icon if the query is valid. If the query is invalid, a red exclamation point icon is displayed. When the query is valid, the validator also shows the amount of data the query processes when you run it. This helps to determine the cost of running the query.
3. Click Run.
The query results opens below the Query editor. At the top of the Query results section, BigQuery displays the time elapsed and the data processed by the query. Below the time is the table that displays the query results. The header row contains the name of the column as specified in GROUP BY in the query.
Task 2. Create a custom table
In this task, you create a custom table, load data into it, and then run a query against the table.
Download the data to your local computer
The file you’re downloading contains approximately 7 MB of data about popular baby names, and it is provided by the US Social Security Administration.
Download the baby names zip file to your local computer.Note: If this download link fails please copy the baby names zip file from the student resources on the left pane of the instruction guide.
Unzip the file onto your computer.
The zip file contains a
NationalReadMe.pdffile that describes the dataset. Learn more about the dataset.Open the file named
yob2014.txtto see what the data looks like. The file is a comma-separated value (CSV) file with the following three columns: name, sex (MorF), and number of children with that name. The file has no header row.Note the location of the
yob2014.txtfile so that you can find it later.
Task 3. Create a dataset
In this task, you create a dataset to hold your table, add data to your project, then make the data table you’ll query against.
Datasets help you control access to tables and views in a project. This lab uses only one table, but you still need a dataset to hold the table.
- Back in the Cloud Console, in the left pane, in the Explorer section, click your Project ID (it will start with qwiklabs).
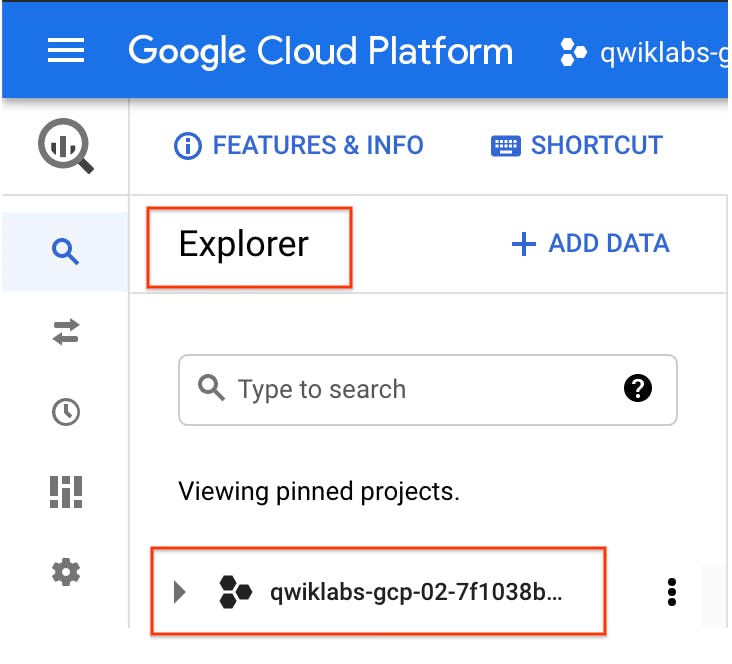
Your project opens under the Query editor.
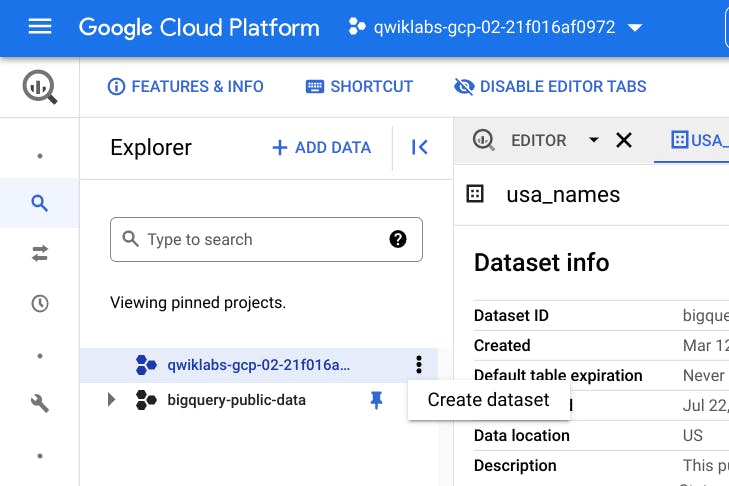
- Click on the three dots next to your project ID and then click Create dataset.
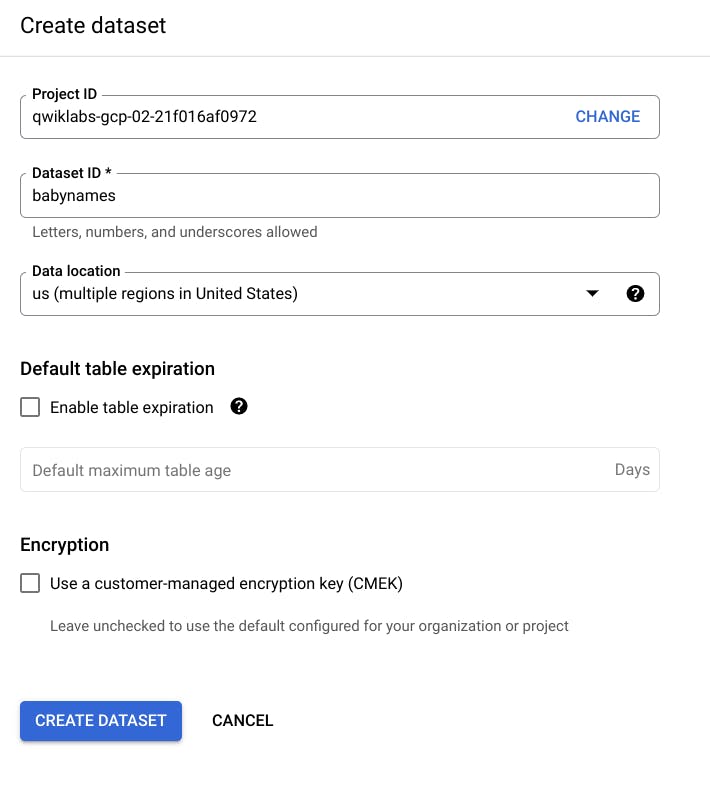
- On the Create dataset page:
For Dataset ID, enter
babynames.For Data location, choose us (multiple regions in United States).
For Default table expiration, leave the default value.
For Encryption, leave the default value.
- Click Create dataset at the bottom of the pane.
Task 4. Load the data into a new table
In this task, you load data into the table you made.
- Click babynames found in the left pane in the Explorer section, and then click Create table.
Use the default values for all settings unless otherwise indicated.
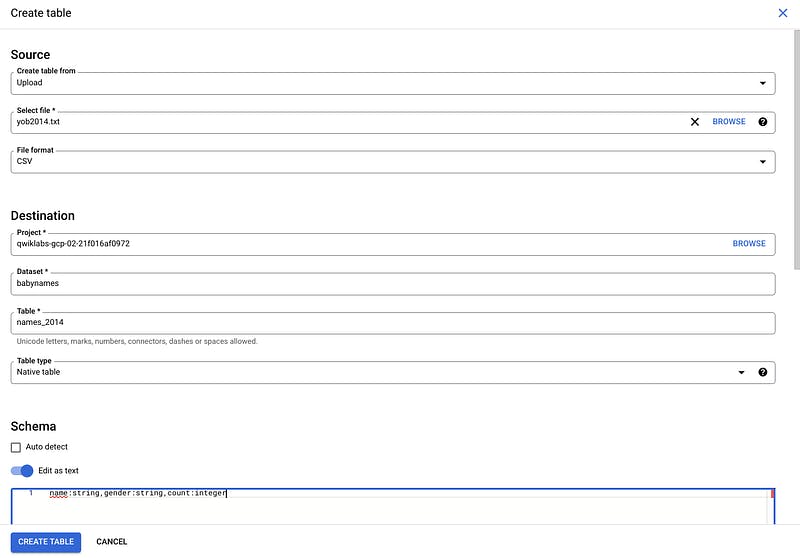
- On the Create table page:
For Source, choose Upload from the
Create table from:dropdown menu.For Select file, click Browse, navigate to the
yob2014.txtfile and click Open.For File format, choose CSV from the dropdown menu.
For Table name, enter
names_2014.In the Schema section, click the Edit as text toggle and paste the following schema definition in the text box.
**name:string,gender:string,count:integer**
- Click Create table (at the bottom of the window).
Preview the table
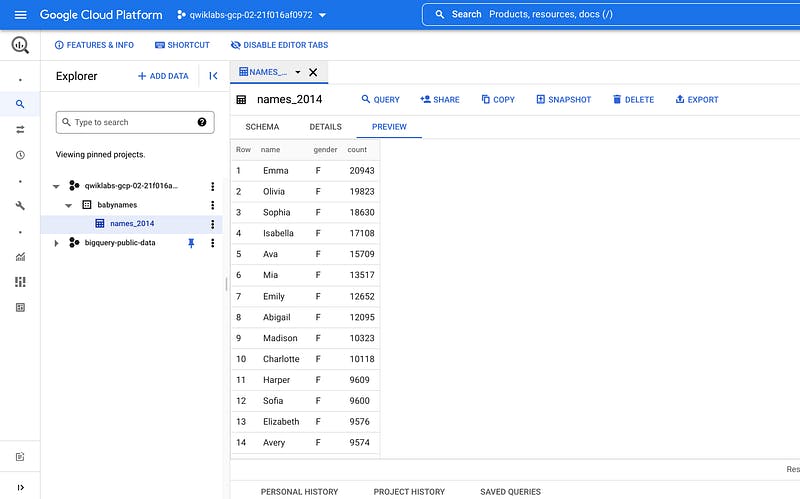
In the left pane, select babynames > names_2014 in the navigation pane.
In the details pane, click the Preview tab.
Task 5. Query the table
Now that you’ve loaded data into your table, you can run queries against it. The process is identical to the previous example, except that this time, you’re querying your table instead of a public table.
In the Query editor, click Compose new query.
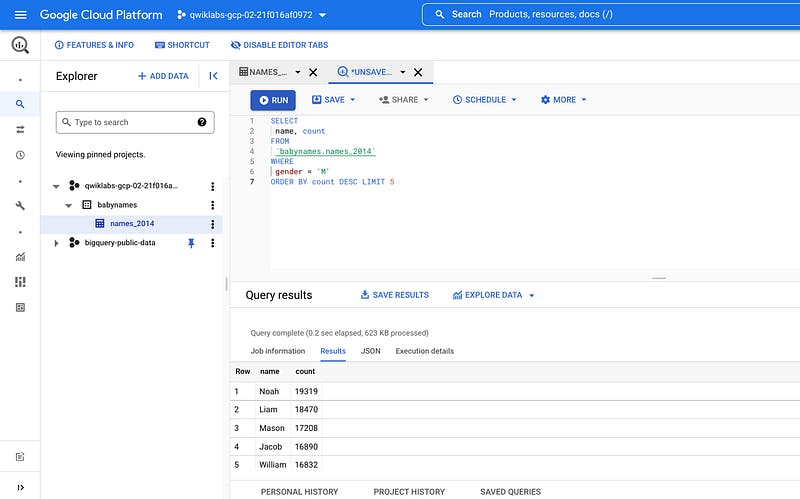
Copy and paste the following query into the Query editor. This query retrieves the top 5 baby names for US males in 2014.
Note: Inside ” it does distinguish upper vs. lower case, therefore make sure to align exactly the names of the dataset and the table you created.
**SELECT
 name, count
FROM
 `babynames.names_2014`
WHERE
 gender = 'M'
ORDER BY count DESC LIMIT 5**
- Click Run. The results are displayed below the query window.
Congratulations!
You queried a public dataset, then created a custom table, loaded data into it, and then ran a query against that table.
Please stay tuned and subscribe If you’d like to learn more about Infrastructure as Code, or other modern technology approaches and study materials on DevOps, K8s, DevSecOps and App Development.
#YouAreAwesome #StayAwesome
Stay tuned and follow me for more updates. Don’t forget to give us your 👏 if you enjoy reading the article as a support to your author!!
If you want to read more join Medium $5 membership at discount with this link here. If you would like to offer me a tip for my work, please click here to buy me a coffee here.


